In practice, effective mastering is all about skill, experience, and of course – having the right tools at hand including mastering plugins. In this article, I’ll cover some of what I consider to be the best mastering plugins out there that I use everyday in my mastering sessions. I’ll be covering a mastering equalizer, compressor, metering, limiter, harmonics/saturation plugins.
Best mastering metering plugin
MeterPlugs - Perception AB

When it comes to mastering in-the-box, you’ll want at least an EQ, a compressor and a limiter – the stuff you’re already familiar with and use for mixing. However, I want to start this list with a plugin that is not an audio processor per se but a must-have.
As you might be aware, loudness changes our perception of music. Louder may be perceived to sound better at first, but is it better? Or just louder? To avoid falling into this trap, you need to match loudness before and after your mastering chain.
Perception AB is one of the plugins that can do that for you quickly and easily. This plugin automatically matches the level of the music you’re working on (pre and post-processing), allowing you to make clear and objective decisions about the best possible sound for your music.
You can bypass the entire processing chain to make before and after comparisons by inserting the Perception AB plugin before the processing chain you want to test and select “Pre”. Then, insert another plugin instance at the end of the chain and select “Post.” Click “Match Level”, and you can toggle between the pre and post audio to compare your music before and after the processing chain with level-matching and total delay compensation. Of course, for more info, you can check out their website and download the user manual.
Best mastering saturation plugin
Tone Projects - Kelvin

In this age of computer recordings, where tracks can be produced 100% in the box, with no analog equipment, adding harmonic content to the material can bring significant benefits. This processing can alter the song’s overall frequency balance and dynamics and change the mix’s overall tone. Some of the usual tools to this are saturation, tape, preamps or tube gear emulating hardware units etc. Many plugins can produce great results in this area, and my favourite for saturation is Kelvin from Tone Projects.

Kelvin is the swiss army knife of saturation plugins. Kelvin is built around two flexible saturation stages in series, Stage1 and Stage 2, hence dual-stage saturation, for unique and complex sonic interactions between stages.
Modelling eight different saturation circuits by using them together, 64 different tone combinations are available from just saturation choice alone! This gives a deep, lively sound and a huge palette of tones available by exploring combinations of models, order and gain staging.
This section alone can produce an endless amount of sonic capabilities with some experimentation and patience, allowing you to dial in any saturation tone you would ever need.
For further fine-tuning and tweaking of the overall tone, they have included three bands of equalisation that allows you to shape the pre and post saturation stages.
Kelvin also includes a spread option that spreads the harmonic distortion across the stereo field and a de-Fuzz option that reduces the mid-high saturation and cleans up distortion artefacts.
On top of all this, soft clipping is at your disposal to tame the transient peaks of your audio. You can also use this creatively by pushing the output trim and adding a third layer of saturation/distortion.

And last but not least, one of the most critical controls with this kind of processing during mastering, a mix control that allows you to blend the dry signal with the wet one allowing you to just add the right amount of saturation.
Best mastering equalizer plugin
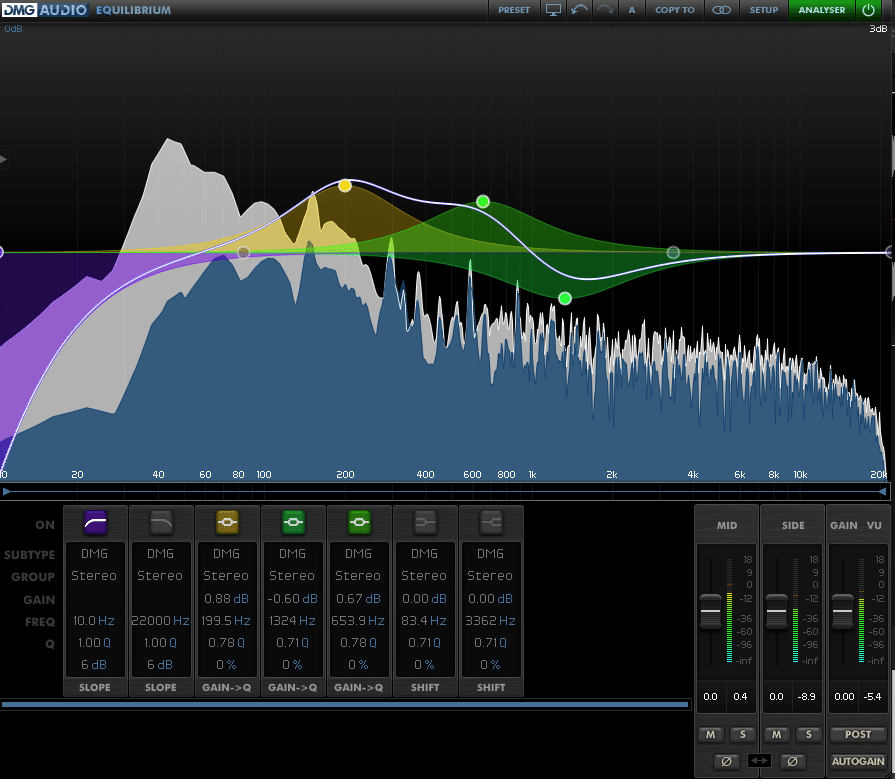
DMG Audio - Equilibrium
Equalisers are one of the most important, if not the most critical, tools in mastering. If you get the track’s frequency balance right then, the rest of the processes will easily come together.
EQs shape the tonal characteristics of audio, making the sound brighter or accentuating the low end and correcting anomalies like a frequency build-up or tame down resonant frequencies in the most transparent possible tonal correction. Another use for EQs is that they can also add some flavour/colouration to the tracks, mostly through hardware plugin emulations.

Here is where DMG Equilibrium comes in as my favourite EQ in the box. This plugin allows you to access all of these approaches and even choose a different method for each specific band. And, rather than being limited to a fixed number of bands like hardware emulation plugins do, it will let you create 32 independent bands allowing you to pick and choose the tone modifications you want accurately.
Each plugin instance can contain up to 32 shelving, filtering, notch or peaking bands, operating in series or parallel and stereo or M/S mode, providing almost unequalled flexibility for tone control. And if that wasn’t good enough, each band can employ accurate models of vintage hardware EQ circuits or super clean digital curves. This is why Equilibrium may be the only eq you need for mastering in the box.
Moreover, the user interface is clean, customisable and easy to use, enabling you to achieve the desired results quickly, which is crucial during the mastering process.
All of the above would mean very little if Equilibrium didn’t sound good, but equilibrium is a fantastic sounding EQ!
Best mastering compressor plugin
Tone Projects - Unisum
Like equalisation, compressors are also commonly used during the mastering process. However, like any other tool, compression during the mastering process is not essential, particularly when a fair amount of compression has already been applied to the track during the mixing stage.
When using compressors during mastering, they can act as a “glue” that ties all the mix elements together into a cohesive whole resulting in a smoother, louder and more dynamically even mix.
Compressors can also be used for “colour” and tone shapers, making the mix sound richer and more energetic without affecting the dynamic range too much.
Not all compressors are the same, and most importantly, not all compressors are designed as mastering compressors. Non-mastering compressors may colour the sound in undesirable ways or even produce distortion when driven hard.

Tone Project’s Unisum has been developed from the ground up as a mastering compressor with an immense amount of flexibility coded into a single plugin. Unisum is a two-channel compressor operating in either Stereo (LR) or Mid/Side (MS) mode. In its window, we can find the standard set of controls found in most broadband compressors: Threshold, Ratio, Attack, Release, make-up Gain, a continuously variable Knee and a gentle 6dB high-pass filter on the side-chain.
However, we can also find some other less common functions such as a three side-chain filter (emphasis, dip and LP) which can increase/decrease the sensitivity in the area of the chosen frequency; a Relax knob which will make the compression less aggressive on the transients; a Gain Reduction limit and a Release Curve, that goes from liner to log, making the sound more energetic or relaxed.

This set of controls alone will let you achieve almost any type of compression. Still, if you also want to add some colour and vibe then you have the option to engage the ‘Hygge’ function, which emulates tubes and transformers inspired by the characteristics of high-end hardware compressors.
Opening the Edit Style at the bottom of the main display is like opening another world of possibilities. These controls will modify how the main compressor section works, and it will take ages to explain it all here, so I would recommend a quick manual read for more details. However, just so you have an idea of what is going on here, the Multiband Detector settings split the side-chain into three different frequency bands via 12dB/octave crossovers, and these are adjustable with low/mid (40-1000 Hz) and mid/high (1-12 kHz) controls. So basically, you have a compressor listening to the incoming signal as a multiband compressor but compressing the signal as a broadband compressor!

A great way to understand what is going on in this section is to open the Style section (bottom left of the main window), which provides 15 different named sets of presets for these additional controls. Then, once you’ve got the compressor acting the way you want on the main section, you can flick through these presets to easily hear what different settings on the edit will sound like and fine-tune from there.
The flexibility and unique controls on this compressor, together with the ability to inject some vibe and colour when required and the outstanding sound, has made this my favourite and most used mastering compressor plugin.
Best mastering de-esser plugin
DMG Audio - Essence
For basic vocal de-essing, there are plenty of good options in the market, but not so much for what I’d consider a good mastering de-esser with the flexibility (enabling scalpel-precise frequency-targeting) and transparency required for mastering.
Using de-essers during mastering can be a great tool, while it may seem like an unconventional tool to use, it makes a tremendous difference when used correctly at controlling excessive sibilance on the lead vocals, taming down harsh-sounding hi-hats, guitars, synths or anything with harsh sounding high frequencies.
A de-esser can also be used on the low-end. For example, if the kick and the bass have excessive resonances, using a de-esser to tackle this issue can create a cleaner, punchier, and smoother low end.

Essence is a true mastering de-esser with many mastering engineers praising it capabilities. Essence can operate in L/R or M/S mode and allows independent setting of Mid and Side channels in M/S mode. This feature is super flexible and can be used to tame down the vocal sibilance in the Mid channel while addressing some harsh hi-hats at a different frequency on the side channel.
It also offers two different approaches to de-essing: a traditional sidechain analysis and compression-only compressing the signal when it’s been detected or the separation and ducking of said sibilant frequencies before mixing them back with the rest of the signal.
Essence’s main window will provide most of the controls you will need for precise frequency targeting and processing signal as needed. However, it is in the advanced panel where things get interesting. With adjustment of Lookahead, Smoothing, Linear Phase, Sidechain Type, Oversampling, Dual Release and a comprehensive mixing section for recombining the various signals involved, this section is what makes this a true mastering de-esser.

Essence is a complex and very powerful mastering de-esser; however, it’s a straightforward plugin to use, with plenty of practical, highly demonstrative presets onboard to get you started and explore its capabilities.
When using a de-esser while mastering, we aim to be as transparent and as undetectable as possible. I think Essence does an outstanding job at meeting these criteria and is the most impressive de-esser plugin I’ve ever used as it imparts a smooth, professional sound to entire mixes.
Best mastering limiter plugin
DMG Audio - Limitless
Limiters are typically used to control transients, preventing them from clipping the master channel. With the transients under control, they increase the overall level of a recording, making it competitive with commercial releases.
However, limiting will affect the mix’s overall sound. For example, the mix can become dull, flat and lacking energy and impact when reducing transients. And if the limiter is overused, it can turn a good mix into a thin, harsh recording lacking dynamics.
Most limiting plug-ins have few controls apart from the threshold and gain settings, but DMG Audio’s Limitless has quite a few options under the hood, allowing you to dial in the desired loudness target in the most transparent way possible.
Limitless is a dual-stage multi-band mastering limiter that can also work as a single-band limiter. It has a straightforward default interface, with its six frequency bands set and ready to go. All you have to do is adjust the Threshold, Ceiling and Release parameters.
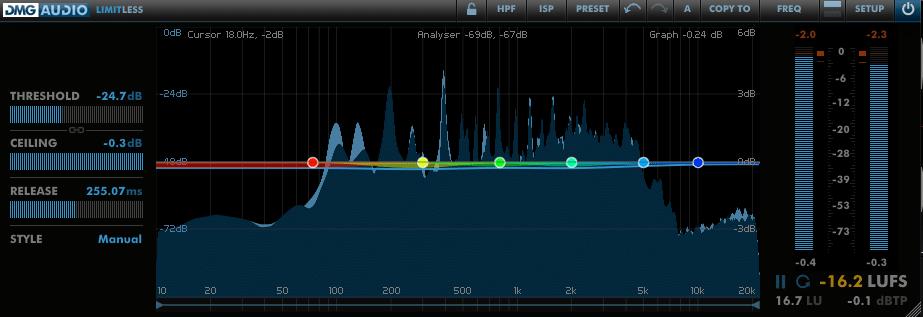
Using limitless in its default state can produce great results, but switching the plugin to advanced mode adds comprehensive options and controls that set this plugin apart from most limiters out there. Some of the settings presented in the advanced mode include Lookahead, Knee, Weighting, Release Shape and Dynamics (ratio). Clipping and dither options, input trim, stereo linking, crossover slope and band separation controls.
Having access to all these parameters under the advanced section can be overwhelming. However, DMG was clever enough to give us a Style section in the main window. There are seven styles available, and these styles will change the settings “under the hood” in the advanced section, so you don’t need to tweak this manually.

All in all, I can’t recommend Limitless highly enough. In my opinion, it is one of the best-sounding mastering limiters out there with easy operation and advanced algorithms. It certainly has become my go-to mastering limiter; it is immensely flexible and capable of a lot of very transparent gain reduction.