First, what is headroom?
When we talk about headroom, we’re not referring to a 1980s icon famous for his glitching and stuttering (that would be Max Headroom for the younger readers). Instead, we’re talking about the available volume space left between the highest peak of a sound wave and 0dB. This empty space provides room to adjust the dynamics of a track during the mastering process.
0dB does not mean 0 decibels as this would basically be silence. Instead, 0dB is referring to how far over or under an audio level is to a reference line. This reference line is looked at as the output of the digital audio workstation or console from which the audio is being played.
So with headroom, what we’re talking about is how much space is left between the highest peak of a piece of audio and the reference line. If it is 0dB, that means we’re hitting the reference line because there are 0 decibels in between the peak and the reference line. At that point, we’re at the bleeding edge of clipping or distorting our audio.
Why you need to leave headroom in your mix
When your mix reaches the mastering stage, improvements can only be made based on the available audio. If your mix is already clipping, there’s no way to undo what’s already been done. The audio level can be turned down, but the clipping and subsequent distortion has already been baked into the audio file, so turning the levels down just means you’ll still hear the clipping, just at a lower volume. Leaving sufficient headroom gives your mastering engineer breathing room to make adjustments to dynamics across the entire track without clipping or distortion being introduced.
How much headroom should you leave?
You want to leave enough headroom for your mastering engineer to work with, but you don’t want to have so much that your music suffers because recorded tracks did not rise above the noise floor of your equipment.
So, what’s the magic number? You may have heard a variety of answers over the years, including -6dB, -3dB or even -1.5dB. The truth is that any of these values can work given today’s digital mastering tools. When it comes down to it, the real number you need to watch out for is once again 0, as in 0dBFS.
This represents decibels to full scale, and if your audio peaks hit this limit or exceed it, you will be creating a situation in which the audio clips or becomes distorted as it loses dynamics. When this happens, there is no way to undo it because the audio is the audio. Essentially, this clipping becomes a part of the 1s and 0s that make up the mix audio file at its core, and even if levels are turned down in the mastering process, the sound of clipping will still exist.
So, you can get away with keeping enough headroom that you aren’t hitting 0dBFS on your meters, but you can also go with old standards like -6dB if you feel more comfortable and want to give yourself some additional space for safety.

Essential tips for getting your mix headroom-ready
Although keeping your audio from reaching 0dBFS is key in getting a mix ready for mastering, there are a few other things you can do along the way to ensure the process moves along with the least amounts of delays.
Below are some tips to get your recording headroom-ready for mastering:
1. Use Compression and Limiting Sparingly
Compression is one of the most widely misused, abused and misunderstood tools in digital audio. When used properly, compression can act as the glue that brings together musical elements, smoothes out a mix and brings life to various elements in a mix. When overused in any step of the process, especially in conjunction with a limiter, compression can destroy a mix and squash the life out of a soulful performance.
Far too often, someone who is new to mixing will attempt to add more headroom to a mix by laying on the compression and hitting the mix with a brickwall limiter to the point where the waveform resembles a sausage. It’s flat with very few peaks, the waveform is squished and tightly packed in and there is no discernible dynamic range.

You may think that squishing a mix gives more headroom, but all it does is make it so that your mastering engineer can either turn the volume up or down. This is not what mastering is, and if it was, there’s no need for mastering because you could just use the volume knob on your stereo to control loudness. As a result, use compression sparingly, even on individual tracks, and never attempt to provide headroom by using hard limiting across the whole mix.
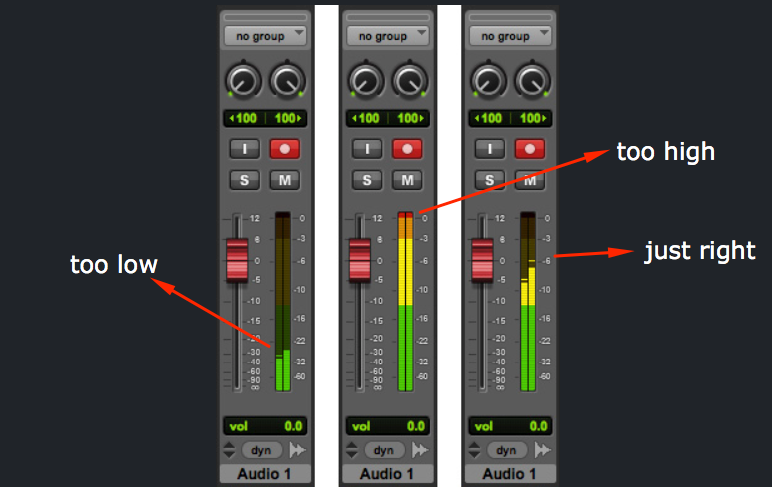
2. Use Your Meters
When mixing, you should rely on your ears first and foremost, but if you really want to ensure your mix is headroom-ready, use your meters. Your ears will tell you if a mix sounds good, but your meters will show you the numerical value in decibels relative to full scale.
These numbers will let you know whether you’re pushing a mix too hard or whether you’re leaving enough headroom. Meters will also help you notice spikes in audio that your ears may not pick up. This will give you the chance to either adjust the mix or use mixing tools to tame frequencies that may be causing spikes that could eat away at the available headroom in the mastering process.
3. Different Styles Call for Different Standards
Also, it should be noted that different standards apply to different styles of music, so how much headroom for mastering can depend on the type of music you’re working with. For example, modern rock typically receives fairly heavy compression throughout the mixing and mastering phases in order to get the “wall of sound” effect.
So, if you’re mixing this type of music, you may be able to get away with less headroom when compared to mixing a symphonic track that has many and varied dynamic changes, swells, solos and more. In the case of symphonic or instrumental songs that utilize many traditional instruments and have many dynamic changes, more headroom is welcome because your mastering engineer will want to preserve the dynamics of the performance.
4. Work With Your Mastering Engineer
Finally, it can not be stressed enough that you should work with your mastering engineer to get the best results. If you have any questions, please get in touch, and I’d be happy to help. If you’d like to see how your track sounds mastered, you can request your free mastering sample here.