Vinyl records have enjoyed a massive resurgence in popularity in the mid-2000s, and sales have shown no signs of slowing down. With more people wanting to hear their favourite bands on vinyl, more and more artists are releasing to cater for this and hence requesting mastering for vinyl.
However, when releasing music on a physical medium like vinyl, there are some limitations to consider compared to digital releases. Preparing a vinyl release is not as straightforward as its digital counterpart.
This article will cover what mastering for vinyl implies and what you need to know when mastering a record for vinyl release.
Thinking of releasing your track on vinyl? I can help you ensure your song is optimally mastered. Contact us or request a free mastering sample.
Understanding how vinyl works and its limitations
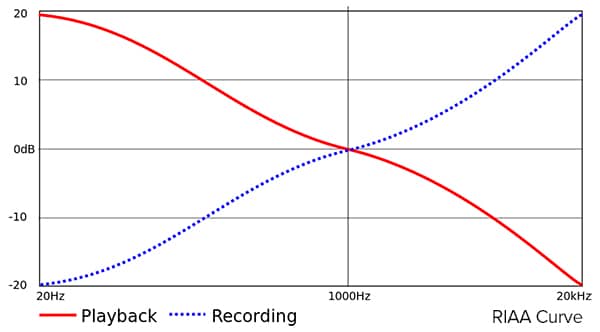
The RIAA equalisation curve
Vinyl records are capable of reproducing the entire audible frequency spectrum, just like digital formats. However, how vinyl achieves this is quite different from the way it works in the digital domain.
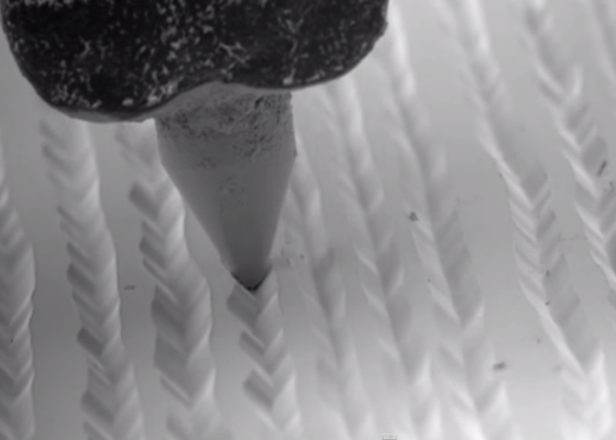
During the vinyl record playback, a needle has to physically track the sound waves inscribed in the vinyl grooves. When cutting these grooves onto vinyl, the lower the frequency (think bass, kick, etc), the wider the groove has to be cut. So if the cut is done from an unaltered digital file, the grooves will be extremely wide to accommodate all of the bass content, considerably shortening the record’s sides and possibly making it unplayable.
To avoid this problem when cutting the low-end audio information, the RIAA equalisation curve system was created and introduced to deal with this issue. The RIAA pre-emphasis curve is a proprietary EQ setting applied to the audio cut onto vinyl, severely reducing low-end frequencies and boosting high frequencies. Since the signal cut onto the disc has much less bass squiggle, the groove is narrower and much more music can fit on a vinyl record resulting in a longer runtime.
Then on playback, a reverse of the RIAA EQ settings (built into the consumer’s record player phono preamp) is applied to restore the amount of low-end and highs to the normal pre-cut levels. This means that the music has the same frequency response as originally intended.
High frequencies / Sibilance distortion
One of the most common issues during vinyl pressing is distortion. This is because the vinyl medium does not handle a lot of high-frequency information well. Because of the physical constraints of the format, excessive high-frequencies tend to distort during the vinyl cutting and playback process if not adequately addressed.
Audible distortion happens when the cutting head or playback cartridge can’t physically keep up with the extremely fast, complex grooves produced by exaggerated high-frequency content. Since the stylus cannot track the groove accurately, the result is a distorted sound anytime the stylus plays over severely sibilant parts of the record.
Instruments such as hi-hats, cymbals and tambourines, and vocals containing a lot of “esess” often cause this type of distortion if not appropriately addressed during the mixing and mastering stage, particularly on modern records and styles such as EDM and hip hop with an exaggerated top end.
Moreover, the physical shape of the vinyl disc has an impact on the high-frequency and sibilant distortion on a vinyl record. When cutting vinyl and also during playback, the outside of the record has and allows for a greater surface area to be cut. As the surface area decreases towards the centre of the record, the ability to cut and playback high-frequencies is significantly reduced, making it prone to distortion.
Yet another reason for sibilance distortion during playback can be caused by a worn stylus or cartridge misalignment, among other things.
Overall, if excessive sibilance and harsh, loud high-frequencies in the music are not properly addressed before the cutting of your vinyl master, we can expect the vinyl record to distort.
Low frequencies and stereo bass
Another common challenge during the vinyl cutting process is excessive low frequencies. Due to the mechanical limitations of the equipment, low-frequencies can be challenging to transfer to vinyl, especially if there is heavy-bass stereo information below 300Hz.
To understand why heavy low-end can become an issue when cutting vinyl, it’s essential to know how the cutting head cuts the grooves into the vinyl. Basically, the audio centre/mono information is cut horizontally (laterally), moving the head left to right during the cutting process; the louder the mono low-end information is, the wider the groove has to be cut. On the other hand, the audio side/stereo information is cut vertically; hence the louder the side signal low-end information is, the deeper the groove must be cut.
Then two possible issues can arise when cutting low-end mono and stereo information into the vinyl. One problem happens when the low-end mono info is so big and loud that the needle is moving so far from side to side that it crashes into its neighbouring groove causing it to jump out of the groove.
The other problem happens when there’s an excessive amount of low-end in the audio stereo/sides, as this is more likely to produce out-of-phase information. An out-of-phase low-end can cause the cutting stylus to cut with excessive vertical movements, alternating between deeper grooves and severe groove lifts. The groove lifts can be so shallow that they could even cause grooves to disappear momentarily, producing audio dropouts.
Vinyl outer versus innermost diameter
Another limitation of this medium, due to the vinyl’s physical nature, is that the frequency response of the disc is different in the outer grooves and in the inner grooves.
Basically, on a vinyl disc, the innermost usable area has a circumference that is less than half of that found at the beginning of a disc resulting in a degradation in high-frequency response as the needle moves toward the middle of a disc.
This is due to the fact that as the radius of the disc decreases, the speed at which the groove is moving past the needle decreases as well. This slow groove speed leaves a lot less area in which to cut a high-frequency groove that swings back and forth a lot faster. By the inside of the disc, the cutting stylus has to fit a lot of audio information in a much shorter and smaller amount of groove space, causing more complex and rapid groove modulations.
As a result, it can cause high-frequency loss, with the overall sound becoming less pronounced on the high frequencies compared to other parts of the disc. Also, it can produce higher tracking distortion during playback because the stylus struggles to accurately trace these grooves, compromising the fidelity of your top end. A subtle loss of top-end is expected as you approach the middle, but higher frequencies can also become distorted as the playback stylus struggles to track the sharp twists and turns.
These shortcomings are known as diameter loss, and the further in you are in the vinyl, the more pronounced these issues become. It is a good idea to leave a large blank area around the vinyl centre label because the very inner grooves have serious sonic problems.

Vinyl playing times & loudness
As a physical medium, vinyl records have limitations on side lengths, on how much music they can fit on each side, which varies according to the recording technique used. It’s important to be aware that the playing time per side is affected by the amount of sub and low-end frequencies, the loudness (RMS) level, and the stereo width in low to low-mid frequencies.
The program length primarily determines the loudness of a vinyl disc. Basically, the longer the playing time, the lower the volume and bass levels will need to be cut to get the grooves to physically fit on an album side. Simply put, the louder the signal, the bigger the mono and stereo low-end information, the bigger the groove, the more space is used, and hence less total time can fit per side.
The longer the side of a record, the more sacrifices must be made to fit all the music on it. The general rule is—the shorter the side, the better quality of sound.
It’s best to follow this guideline for ideal and maximum recommended playing times for record sides.
Vinyl Recommended Ideal & Max Playing Times per Side
| Record Size | 33 RPM | 45 RPM |
|---|---|---|
| 07" | Ideal: 5 mins // Max: 7 mins | Ideal: 3 mins // Max: 5 mins |
| 10" | Ideal: 9 mins // Max: 14 mins | Ideal: 8 mins // Max: 10 mins |
| 12" | Ideal: 16 to 20 mins // Max: 25 mins | Ideal: 6 to 12 mins // Max: 15 mins |
Skipping needle during playback
Another thing to consider when dealing with a vinyl release is the possibility of needle skipping during the vinyl playback due to a sudden dramatic increase in volume.
Sometimes, between songs or song sections, a digital master can go from a very low playback level to a very loud one without any issues. However, on a vinyl record, such a dramatic increase in volume can cause skipping. This happens because a dramatic increase in volume will result in a dramatic groove cut. When the needle of a record player is tracked through this cut, the bump can cause the needle to kick and skip its intended groove.
Mastering for vinyl – Do we need to master differently for vinyl?
Every mastering engineer will have their own approach when mastering for vinyl. Some say that a specific master for vinyl isn’t necessary, and one unique master will translate equally well on CD, as it would to vinyl.
In my opinion, creating a separate master for vinyl from scratch isn’t necessary. Instead, once the digital masters are done, tailoring and adapting these masters toward the physical limitations of a vinyl record to achieve the optimal sound quality would be the best approach.
As presented above, due to its physical nature, the vinyl medium has limitations that are not presented on CD and digital releases. And since modern music pushes some aspects of these limitations, simply transferring these masters into a vinyl record could cause serious cutting and playback problems.
Sometimes there is a trade-off or discrepancy between the digital release and vinyl release. For example, specific genres like EDM, electronic or hip-hop, with very loud and intense, phasey low-end synths and harsh highs, won’t sound the same as the digital release once optimised for the vinyl release. Will it still “represent” the original track? Sure it will, but there will be differences too.
Optimising the masters for vinyl is critical to avoid the issues discussed in the previous section and ensure the record will playback on a turntable without any problems.
Optimising high-end, low-end and stereo information for the vinyl cut
It’s important to optimise the vinyl master frequency distribution to avoid any issues during the cutting and playback process.
- Optimising the high end:
Frequencies above 20kHz translate into noise and distortion on vinyl due to the overheating of the cutting head. To avoid this issue using a low-pass filter to cut 18kHz and above can help.
To avoid distortion due to excessive sibilance, a de-esser can be applied to reduce these harsh frequencies.
- Optimising the low end:
Frequencies below 20Hz and also low-sub information around 30Hz can cause the needle to jump out of the groove and also use extra space unnecessary. Typically, a low cut filter is used to control and maintain the bass frequency information of the audio.
- Optimising the low-end’s stereo information:
Make the side signal mono-compatible up to 200 Hz in order to avoid audio dropouts or the stylus skipping. Sometimes vinyl cutting facilities will use tools such as EE (elliptical equalizer), which takes low-frequency stereo information and sums it to a mono signal, thus preventing excessive vertical modulations on the grooves.
Optimising vinyl playing times & loudness
When cutting vinyl there’s nothing to be gained by squeezing a master through a digital maximiser or limiter to produce a constant digital level of OdB, unless you particularly like that sort of sound.
When it comes to vinyl playing times and loudness, the cutting engineer will decide and control how loud it can be cut no matter how loud your digital masters are. For this reason, it’s best not to use a limiter or at least reduce its level on the final master intended for vinyl. A quieter, more dynamic master will generally work and sound better when cutting vinyl. There are quite a few benefits when lowering the cutting level.
- Cutting at lower levels can reduce the risk of sibilance distortion.
- Quieter cuts can translate to a less stressed stylus during playback, with better chances of tracing grooves more accurately and avoiding distortion.
- Quieter cuts will use less space on a vinyl disc helping to avoid the undesirable characteristics of the innermost diameter.
- Reducing the cutting level can also be beneficial when dealing with music that has a lot of low-end vertical information as there will be less risk of severe groove lifts.
- Even when submitting masters that are not super loud, the cutting engineer can still give you a loud cut. Allowing the cutting engineer to control the loudness is essential to creating a good record. Generally speaking a level of -10 to -12 dB RMS with a few decibels of headroom can be a great starting point when submitting your masters for the vinyl cut.
Avoid vinyl innermost diameter issues: album sequencing
The vinyl sound quality can be greatly influenced by the duration and order of songs. As we have seen, longer music content takes up more groove space, bringing you further inside the disc where sound quality starts to deteriorate. And as we now know, intense music with a lot of high-frequency energy (e.g. fast upbeat songs, loud rock tracks, etc.) are prone to present issues when cut in the vinyl innermost diameter.
Unfortunately, because of the nature of the format, we can never completely eliminate this deterioration. We can, however, lessen its impact by following some of the below recommendations.
Keep the running time per side at an optimal length, and avoid cutting too much in the innermost diameter. When possible, keeping the running length of each side up to 20 minutes or less usually provides great results.
Another strategy to prevent the noticeable deterioration of the innermost diameter is by making sure that the last tracks on each side are less intense with a more mellow high-frequency range (e.g. a ballad, a laid-back instrumental track, acoustic song, etc.). When you know the record will be released on vinyl it is important to take this into consideration for the album sequencing. Try placing demanding, powerful and exposed tracks at the beginning of the required side and not towards the end of the record. While not required, sequencing your music this way can result in a more pleasurable listening experience.
Also, when working on the sequencing and the order of a record intended for vinyl pressing, it’s important to keep both sides running times relatively balanced so both sides can be cut with similar sonics and loudness.
Mastering for vinyl – File formats & deliverables for vinyl production
Mastering is the final stage of the recording process before the music is released to the public. Mastering is about adjusting the sonics and the last round of tweaks before calling it done. However, an essential part of mastering is sequencing, spacing and prepping a record with various delivery formats for the different distribution mediums.
When preparing the deliverables for digital releases, most of the time this involves creating a DDP for the CD duplication plant and various WAV files with different sample rates for the aggregators and distributors. All of these files will contain the corresponding embedded metadata for the project and the sequencing and spacing between tracks.
On the other hand, preparing the deliverables for the vinyl cutting facilities requires an additional and unique set of files. Below I’ve listed some of the most common requirements requested by the cutting engineer to supply when submitting a project for vinyl cutting. Nevertheless, always check with the cutting engineer what their preference and requirements are.
- Export fully-assembled SIDE A & SIDE B masters. Instead of delivering the individual files, as you would send to an aggregator for the digital release, exporting as two continuous (24-bit WAV) files (one file for side A and one for the B side) lessens the margin of error on both the sequence and spacing.
- Create a DDP file. Another option is to prepare and create a DDP file specifically prepared for vinyl cutting. DDP files will contain all the required information for the cutting engineer free of errors.
- Deliver files at the highest native bit depth and sample rate. Deliver your cutting masters at the highest native sample rate the music was mastered at (eg: 96Khz) and at 32-bit.
- Submit a cue sheet. When delivering your files, particularly if supplying masters as two continuous WAV files, submit a cue sheet so the cutting engineer can know exactly where tracks begin and end.
- Provide catalogue/scribe numbers. Scribe numbers are an alphanumeric identifier that is etched into the lead-out (matrix) area of the record. The matrix inscription is important to help identify a vinyl record throughout the manufacturing process as it is the only way of visually identifying lacquers and metal parts during this process. Numerous vinyl cutting sessions have had unnecessary delays because of scribe numbers not being ready on time. The sooner you have the scribe numbers ready, the smoother the vinyl manufacturing process will go.
- Individual files per song. Alternatively, some cutting facilities also accept individual masters. If and when supplying individual tracks, it is important to include the silence you require between tracks in the actual tracks. Also, a common name convention is to label the files as A1, A2 / B1, B2 etc to avoid any misunderstanding about which order and on what sides the tracks are to be located when cutting.
Conclusion
As we have covered in this article, there are quite a few specific limitations and things to consider when mastering for vinyl. Understanding these limitations is key to producing a great master that will translate well, and most importantly, will playback with no issues once pressed on vinyl.
As we’ve seen, having separate masters tailored for vinyl allows us to overcome some of the physical limitations intrinsic to a vinyl record. Thus, mastering for vinyl is not about creating something sonically different just for the sake of it, but instead is about minimising the technical limitations of the vinyl record.
Following the recommendations is essential to avoiding the various forms of distortion, issues with stereo imaging, and record playback.
However, I believe the most important thing to do when mastering for vinyl is to have a good line of communication with the vinyl cutting facility. Communicate any specific concerns regarding your masters in advance and provide detailed notes when submitting the mastered files. Even before you submit the tracks, check with them what their requirements are in terms of deliverables and files submission. Make sure they understand your goals.
I can’t stress this enough: good communication can lead to the most favourable results and is much more productive than submitting audio and contacting them after you have received test cuts, reference lacquers, and/or test pressings.